A couple of weeks ago I was once again searching for a universal synth editor. My last search revealed MidiQuest as the only universal editor for Windows. It seemed to cover most of my devices, but I wasn´t sure if it would match my requirements. And even though it´s price may be justified I wasn´t willing to pay it just to find out.
So I kept searching and eventually found a post on a forum that linked to Ctrlr. And was I surprised! Latest build from not 2 weeks ago, an alive forum and promising features.
Since then I spent quite some time with it, and even though it´s work in progress it provides all the features i needed for my synths that are a little peculiar SysEx wise.
What the engine doesn´t offer one can add using the lua scriptengine. Well, sometimes you just have to, but for me that´s more a plus than a minus..
Category Archives: Gear
CS15D channel 1 modification
Since I got my CS15D I´ve always known that one day I would make a certain modification to it, and this day has finally come: Manual control for channel 1.
Mod design
When I opened the synth the first time I was pretty surprised by what preset meant before the time of (affordable) digital memory! Each preset is a set of resistors defining the CV values of the parameters.
The channel 1 and 2 presets reside on distinct PCBs.
I eventually managed to grab a copy of the service manual, and it made it pretty obvious that it would not be too hard to replace the presets by controls. The service manual reveals that all parameter CVs use the same 10V voltage source. The preset selectors route this source to the respective preset subcircuit. Channel 1 manual mode is not so much different. The voltage source feeds the control pots that are buffered by op-amps.
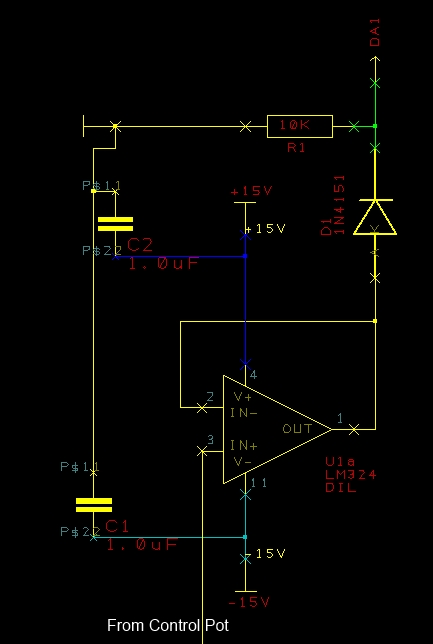
CS15D manual control subcircuit
The overal design of the synth proved execellent for the modification.
The preset selector switchboard can be easily unscrewed from the front panel and the panel slits provide enough space for the new pots.
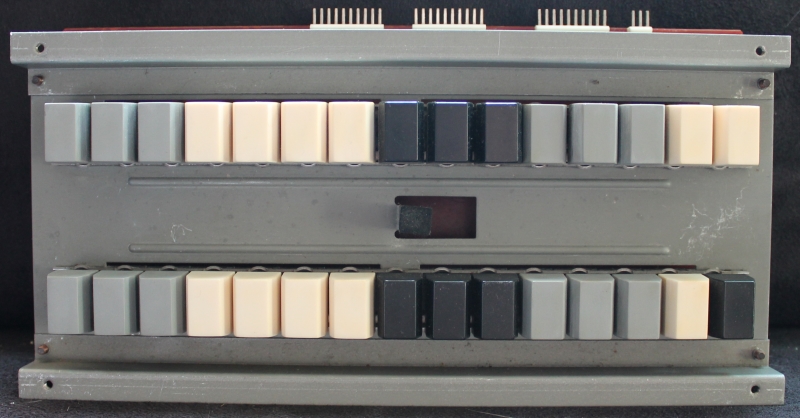
CS15D preset switch panel
The preset board for channel 1 can also just be unplugged and taken out, and the board connectors reused to feed and source the modification board.

CS15D channel 1 preset board (PM1)
This design makes it easy to replace the original components with the custom control modification without altering the original circuits or messing up the front panel.
Now the modification was pretty straight forward:
- Build a PCB with the driver op-amps, voltage source routing and board connectors.
- Build a control panel
It was not so complicated, but a lot of soldering work..
Once finished, I hooked it all up, switched on the synth and… It worked!
But just for a short time, which brings me to….
The Tr7 problem
A minute after I started calibration works on channel one, a flashy bang to my left silenced the audio output of the CS15. After a short notion of anger and a little fear I might have damaged an irreplaceable custom chip, I searched for the fault and located it soon: A transistor blew into pieces. Lucky enough the marking on the front was still readable, and a glance at the service manual revealed the function of the destroyed part. Tr7 on the VCO board is the actual 10V source for the preset circuit, regulating +15V from the main power supply down to 10V.
I first assumed I caused a short circuit while calibrating which lead to the destruction of the transistor, so I simply replaced it with a new one and went from there. Not long though till the replacement gave up, too. So obviously my modification lead to an overload. I replaced the voltage source for my mod board with a power supply generator, which told me my circuit draws ~30mA. The transistor provides a base-emitter current of 150mA, so my assumption didn´t seem so far fetched.
I then decided to include an 7810 voltage regulator into my board, feeding it directly from the main power supply. And what can I tell you… problem solved!
Summing up
Yamahas design for the manual controls has a very handy side effect. The driver op amps can also work as CV mixers. So you can easily hook up an external CV input in parallel to the control pot for each parameter. Due to space limitations, I did that for pulse width, filter cutoff and resonance. Now I can feed in an LFO from my modular, too. But this also leaves some space for improvement on my circuit. The eurorack modul CV voltage is in the 5V range. The CS15D works with a 10V range. So I still have to include amplification for the incoming signals…
The happy ending
The mod works and I am very happy with it. I am not so much a fan of presets anyways and it never made sense to me to create the sound of a trumpet or clarinet with an analog synth. So now I have a brilliantly sounding synth with two manually controllable channels.
For the below video I hooked up MFBs Urzwerg to each of the channels CV/Gate inputs (via a CV converter of course) with two slightly different sequences. One channel plays the bass part and the other one the melodic part. In addition to the sequence I recorded two solo melodies.
Yamaha CS15D modified from MacroDX on Vimeo.
BCR2000 resource packs
The zip files provided here each contain the following:
- Overlays for SkinMan and ready to print.
- Preset SysEx files for BC Manager or direct transfer to the BCR.
- As it is not possible to tell the BCR how and where to include the MIDI channel number within the SysEx message, the byte containing the channel number must be hardcoded within the SysEx file. Refer to the ReplaceMIDIChannel_README textfile in the package for a search-replace string to change the MIDI channel to your needs.
- BC Manager SysEx Definition File (if applicable)
You may use the content of the packages for your own purposes. For distribution, please link to this site.
Related posts:
- BCR2000 Resource Pack for Roland JX-8P
For more information see Custom overlays for BCR
- BCR2000 Resource Pack for Synth In A Case
Synth In A Case is an ensemble for Native Instruments Reaktor.
You will have to manually assign the controllers used by the BCR preset.
 BCR2000_Reaktor_SynthInACase.zip
 - BCR2000 Resource Pack for Roland α-JunoBCR2000_Roland_AlphaJuno.zip
Can be used with both α-Juno 1 and 2. - BCR2000 Resource Pack for KORG M1BCR2000_KORG_M1.zip
KORG M1 has different parametersets for single and double mode. This pack only supports double mode patches! - BCR2000 Resource Pack for KORG Polysix (KLC)BCR2000_KORG_KLC_Polysix.zip
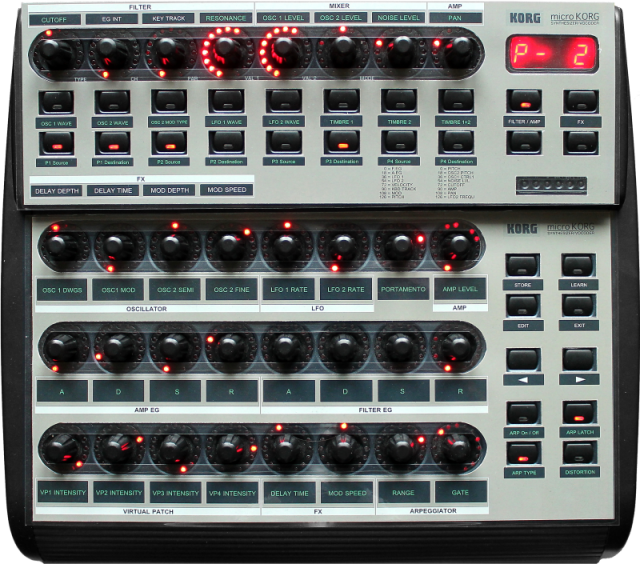
For the KORG Legacy Collection Polysix VST plugin. Please note that not all controllers used in the patch are already assigned in the default controller map! - BCR2000 Resource Pack for KORG microKORG
- BCR2000 Resource Pack for KORG DW-8000
Custom overlays for BCR
Proper overlays greatly increase usability of the device. You can visualize the controls much better as opposed to just text-labelling and thus bring you much closer to the device you are controlling with the BCR.
The BCR2000 Templates document that you can find on the official downloads page contains simple overlays for control labelling. But I was looking for a way to create enhanced overlays that visualize the device being controlled rather than just labelling the controls.
Custom overlays with SkinMan
SkinMan is a freeware program for creating skins for audio plugins. I created templates for the upper and the lower sections of the BCR. SkinMan can be found here.
Download the SkinMan templates here.
The templates contain grouped elements of four basic types:
- Background: The overall background of the overlay.
- Cutouts: These should be left as they are, blank sections to be cut out of the printed layout. They represent the actual buttons and encoders on the device.
- Labels: Editable primitives for the label background.
- Label text: The text fields for each label.
To create your overlay, do the following:
- Download and install SkinMan
- Download the SkinMan Templates and open them in SkinMan.
- Design, hide, add or remove elements to your liking.
- When you´re finished, export the image via the File menu and print it out. I recommend to use good quality photo paper.
Use DIN A4 (210 x 297 mm) as print size. Make sure to use borderless print setting, or the control cutouts will not fit!
 - Cut out the cutouts (hence the name, right…) with a sharp cutter.
- For long term protection, laminate the overlay.
- Cut out the lamination foil again and you are done.
You may want to download one of the BCR sets below and use the contained overlay as an example.
BCR SysEx support
The BCR2000 SysEx capabilities are hardly covered by the official documentations and tools. I guess nowadays such controllers are mostly intended for use with software, to control DAWs and plugins. But they are equally ideal to control those 80’s to 90’s digital synths, which lack hardware controls but provide parameter setting via SysEx messages.
The BCR2000 is perfectly capable of that, but you have to know how to set it up. You can always use the learn function to assign a SysEx message to a control. If the SysEx message is simple, the BCR will perfectly recognize it. For proper setup however there is a perfect tool out there called BC Manager. It needs a while to get used to the interface, but you can edit and control every aspect of the device with it, send and receive data and manage multiple devices. A must-have for every BCR owner!
If you want more information on the SysEx capabilities of the BCR, check out the resources and links on the Mountain Utilities BCR/BCF page, too.